Coursework Location Scout 2

For the first half of my film, I need an indoor location to act as a room in Charlotte and Emily’s house, in which they can have an argument. I have decided to use my own living room, as it is easiest and I can rearrange furniture if necessary, without feeling guilty.

shot from behind the sofa where Charlotte will be sitting
my living room, showing the door where Emily will enter and the TV Charlotte is watching

Charlotte will pick Emily up after school, so I went to the local primary school to get an exterior shot of where Charlotte will wait.

the wall where Charlotte can wait on her phone for Emily
the front entrance to the school

I also need an outdoor path/road location, which is where Emily and Charlotte will walk along after school and Emily will get hit by the car. Therefore, to film in this location, I need a quiet road and pavement to avoid other pedestrians getting in my shots and any risk to my actors, as I do not want Emily to actually get hit by a car. I walked round my local area to scout out any potential quiet roads that would work. See below some of my options.

It is not very obvious if/where the crossing is in this location, so I don’t like it that much.

I don’t mind this location, but it is very residential and was surprisingly busy, so for practical reasons I don’t think I will choose it.

I like the road lines visible in this one, as it makes it more obviously a road.

The bollards in this are quite good and the pavement stretches out, making the crossing even more obvious, but the road is then quite narrow and doesn’t look very dangerous.

This is the same piece of road and I like the path in the distance, though I’m not sure if I would do a shot from this angle in the actual film.

I like this one because the tactile paving makes it obvious it is a place to cross; however, the road running to the left is a major road and I don’t think it will be safe to film so close to it.

After testing a few different areas, I think I have decided to keep it simple and use a road very close to my house that I know is not very busy and therefore fits my purpose. It is probably most safe, because I know the road extremely well, and the major roads are further away, so any car noises will immediately alert me to the fact that a car is approaching and we can move out of the way, which will keep my actors safe.

the path Emily and Charlotte will walk down
the path is very narrow so Charlotte can complain that Emily is not giving her enough space
overhanging bush that reduces the room on the pavement
dropped kerbs on either side for Emily and Charlotte to cross (first option in the foreground, second option in the background – the other side of the junction)
close up of the first dropped kerb
another dropped kerb just further along
the further-along dropped kerb from the other side

I have not quite decided which out of the two crossings to use, as both are suitable and have dropped kerbs either side. I may take photos from both on the day and see which look better, as they are within metres of each other.

Coursework Wardrobe Planning

For the first part of my film, Emily and Charlotte will be wearing school uniform. For the second half (the park/graveyard scenes), I want them both to be in colourful jumpers that have a similar colour and co-ordinate with each other and then some jeans. I was going to use my actors’ own clothes, as they will definitely fit and suit them; however, Charlotte (the actress playing Charlotte) does not own many colourful jumpers, so I looked through my own wardrobe to find something that fit what I was picturing a bit better.

Emily

some of Emily’s own jumpers and jeans

I really like the darker jeans (on the left) with the embroidery on, as I feel this works with the bubbly younger sister character I am trying to convey. These jeans look nice with the blue jumper on the right.

the finished outfit – worn by Emily

Emily also picked out her name bracelet and the sparkly blue shoes, which I think are the perfect finishing touches to this outfit.

Charlotte

I searched through my wardrobe for colourful jumpers and I decided to go for a multi-coloured one I had, in the hopes that one of the tones of blue in it would match Emily’s jumper. I wanted Charlotte to wear a bright jumper to show her happier mood when spending time with Emily and then to contrast her scenes in the graveyard. Charlotte (the actress) had plain black jeans she could wear to go with the jumper and I also like the contrast of bright top with dark bottoms.

the colourful jumper for Charlotte to wear
some of the blue tones in the jumper to match Emily’s
the finished outfit – worn by Charlotte

The look was finished off with Charlotte’s black converse that are necessary for the part where she has to tie up her shoelaces.

Overall, I am very happy with the costumes, as I think they fit the mood for this part of the film and how the characters are feeling until the end, and then Charlotte’s bright jumper becomes a contrast to the darker tone. I am pleased with the co-ordination of the two outfits together and think they will look nice in the shots with both Emily and Charlotte.

Coursework Prop Acquisition

For my short film, I do not need many props, but I have decided to ‘dress up’ the gravestone with some toys so it looks more like a child’s. These are old items of mine that I found around the house and look a bit worn, which makes them more plausible, as on a gravestone they would have been outside in all types of weather.

Additionally, as there were no real forget-me-nots in my graveyard location, I have bought some artificial bunches off Amazon that I will place in the ground near a bush of similar-looking purple flowers so they do not look too out of place.

a trinket box
an old stuffed husky of mine
the frame which will have a photograph of Emily in
two bunches of artificial forget-me-nots bought from Amazon
a small piece of the bunch chopped off that will be the flowers Emily picks up
mock-up of how the objects will look on the gravestone
mock-up of the objects with the flowers placed by the frame

Coursework Hand-Drawn Storyboard

Before shooting my digital storyboard, I thought it would be useful to have a rough (emphasis on rough) hand-drawn storyboard, so I would be more efficient for my photo taking and would therefore not waste too much of my actors’ time. As there are 52 images here, I will need to take less than half of them digitally for my graded storyboard and drawing them out has helped me decide which shots are more suitable/manageable to carry out.

Coursework Location Problem: Gravestone

In my film, the character Charlotte realises her younger sister Emily is dead when she trips in front of a gravestone and sees Emily’s name inscribed. This part of the film raised both logistical and moral questions, which I had to think carefully about when on my location scout. Using a real gravestone seemed highly problematic, so I tried coming up with various possible solutions, such as buying or making a prop gravestone, which I deemed too difficult, as prop gravestones are usually over-the-top Halloween decorations and making one would be time-consuming, expensive and would probably not look realistic either.

The available products on ghostlygravestones.com

I was offered to use the gravestone of a friend’s relative, but I felt this was still rather inappropriate and I did not want to risk catching the personal details from it or other gravestones in the background. A suggestion was made to use only the back of a real gravestone to avoid being disrespectful, and I decided this was the best plan of action.

Some gravestones had built-in side flower pots and I thought that I could pretend the back of a gravestone was actually the front with one of these – avoiding showing any inscribed information and also my actress having to go round to the front and pretend the gravestone was her sister’s, whilst seeing the name of the actual buried person. However, I still needed a relatively new gravestone to show that Emily’s death was recent and even using the back of a new gravestone felt wrong. Less important but still a valid problem was the fact that most of the newer gravestones are shiny stone, meaning my reflection might be seen in the shot as demonstrated in the picture below.

(I hesitated over the use of this photo for the aforementioned moral reasons, but I felt it was valuable to show the practical concerns as well as moral)

When visiting the graveyard on my location scout, the back of the gravestone pictured below seemed most ideal to use, as it was out of the way in the corner of the graveyard and the back was not shiny, so I wouldn’t catch my reflection.

The back of a relatively isolated gravestone in the corner of the graveyard

Before I left, I decided to check the name on the front of the gravestone to pay my respects and see if I still felt comfortable using the back of it in my picture, whilst knowing who was buried underneath it. Surprisingly, I discovered that there was actually no name on it, it marked where found “remains” had been laid to rest. I wondered if the remains were really old or even potentially unidentifiable animal remains, so I decided to research further to ascertain the appropriateness of using the gravestone.

The front of the gravestone (as seen in my ‘Location Scout 1‘ blog post)

Having spoken to a local resident and reading local newspaper articles, I found out that the remains were human and were dug up when a fence was being installed into the garden of the property. According to the reports, there were no suspicious circumstances around the discovery or death and radio-carbon dating suggests the bones date back to pre-1890 or even significantly earlier. Therefore, I felt that it could not be considered particularly disrespectful or immoral to use the gravestone, as long as I set forth my justification and knew that I would be happy with the reasoning myself.

I think taking the time to evaluate these questions of morality is very important, and by doing my research, I learnt a very interesting story about these remains, and hopefully sharing the story acts as a memorial in itself. Unfortunately, there was not much more information to be found so I will leave the story to rest here, as the remains now rest peacefully in a designated space in a graveyard.

Coursework Location Scout 1

For the second half of my film, there are two main locations: the park and the graveyard. I had some possibilities in mind from my more immediate local area, but my actress, Charlotte, recommended a relatively nearby graveyard and park that she knew were opposite each other, so as part of my location scout, I went to visit and found them to be the ideal setting for my film. During my location scout of the graveyard, there were no visitors, although I would have stopped taking pictures if any had arrived, and I was quiet and respectful throughout.

The park that Charlotte will take Emily to
Front view of the swings
Back view of the swings
Swings from an angle with the balance beam equipment in the background
Main entrance into the graveyard
Older part of the graveyard with the church off to the side
Path into the newer part of the graveyard
Smaller side-gate into the graveyard that Charlotte and Emily will walk through
Path parallel to the road, down the side of the graveyard that leads to the side entrance
Looking down the path from the smaller side-gate
Ahead path to the right leads from the older part of the graveyard, immediate left path turns into the newer part – where Charlotte and Emily will be walking along together
Looking backward whilst on the path Charlotte and Emily will walk along
The point on the path where Charlotte will stop to tie up her shoelace
The side path leading to the shrubbery where Emily will pick the forget-me-not flowers
The real flowers that will act as a backdrop for the planted forget-me-nots
View from the path leading to the larger side entrance
Further back on the path that leads to the side entrance
Wider shot of the area surrounding the path leading to the side entrance
The side entrance to the graveyard
The bench in the corner of the graveyard
Down the far side of the graveyard, behind the trees – where Charlotte will look round for Emily
The back of the gravestone that I will use as Emily’s, framed through the bench slats
Another shot of the gravestone with me trialling some framing options
A different angle of the back of the gravestone
The front of the gravestone

Note: I have written a blog post assessing the morality of using a gravestone in my film project and thought deeply about this before including or taking any of the photos above.

Coursework Camera

The camera which is available to me and with which I am most familiar is my own digital Canon PowerShot SX710 HS. It has a variety of settings and a good auto mode, so I should be able to take good pictures with it. It can also transfer pictures directly to my phone via Bluetooth, which is a good back-up option in case they don’t upload successfully to my computer, so I know I will always be able to access the pictures.


Coursework Research Into Storyboarding Conventions

Storyboards can be very different from project to project, and in this case, I will be doing a digital storyboard. There are still some conventions that should be adhered to, such as:

  • a shot number for each image
  • an image that will reflect the actual shot
  • correct framing of the image to fit that of the actual shot
  • the duration of the shot
  • information about any action
  • the dialogue occurring in the shot
  • specific transitions/editing
  • specific sound choices (particularly non-diegetic)
  • camera movements (these are depicted through the use of arrows going in the direction of the camera movement)
An example storyboard from Gladiator

Coursework Research Into Lighting

Questions to think about when lighting a scene:

  • which props should be emphasised
  • which perspective the shot is from and what that character should be able to see
  • what the tone/emotion of the scene is and how this can be conveyed through lighting
  • how should the characters be lighted differently to distinguish between them

Types of lighting:

Basic lighting (3-point lighting) –

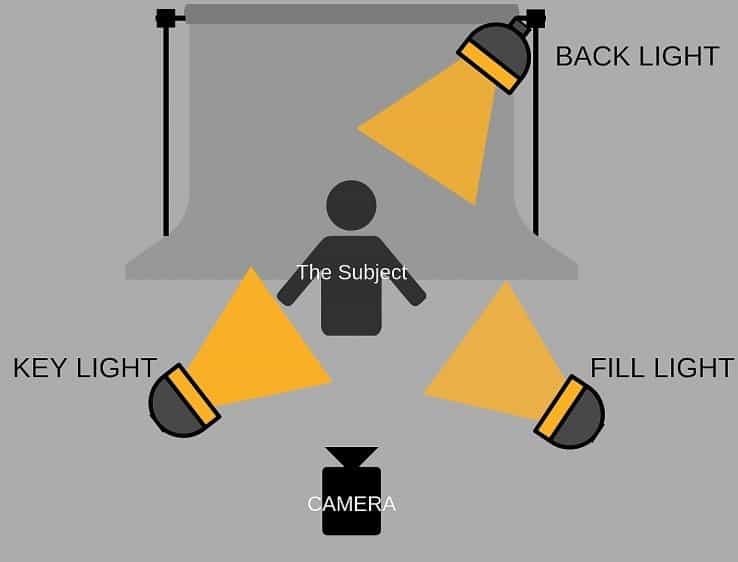
The subject is lit from three sides – the front, back and side with a key light, back light and fill light. The key light is most dominant so should be placed where the greatest emphasis is wanted on the subject’s face. The backlight separates the subject from their background and is often placed at a higher angle than them. The fill lights removes some of the shadows created by the key light and keeps the other side of the subject visible, though not as bright.

What is a 3 Point Lighting System? – The DIY Home Video Studio Project

Natural lighting –

Makes use of the light available at the location, making the time of day very important when shooting. Bounce cards can be useful to redirect the available light and black flags to block it out. It is very important to visit the location and test the availability of light when relying on natural lighting.

13 Film Lighting Techniques Every Filmmaker Should Know

High-key lighting –

Creates a very light tone by having lots of white and very little shadow. Makes for a bright, optimistic scene by increasing the key light and using a lot of fill lighting.

Morgan Freeman Would Return for Bruce Almighty 2

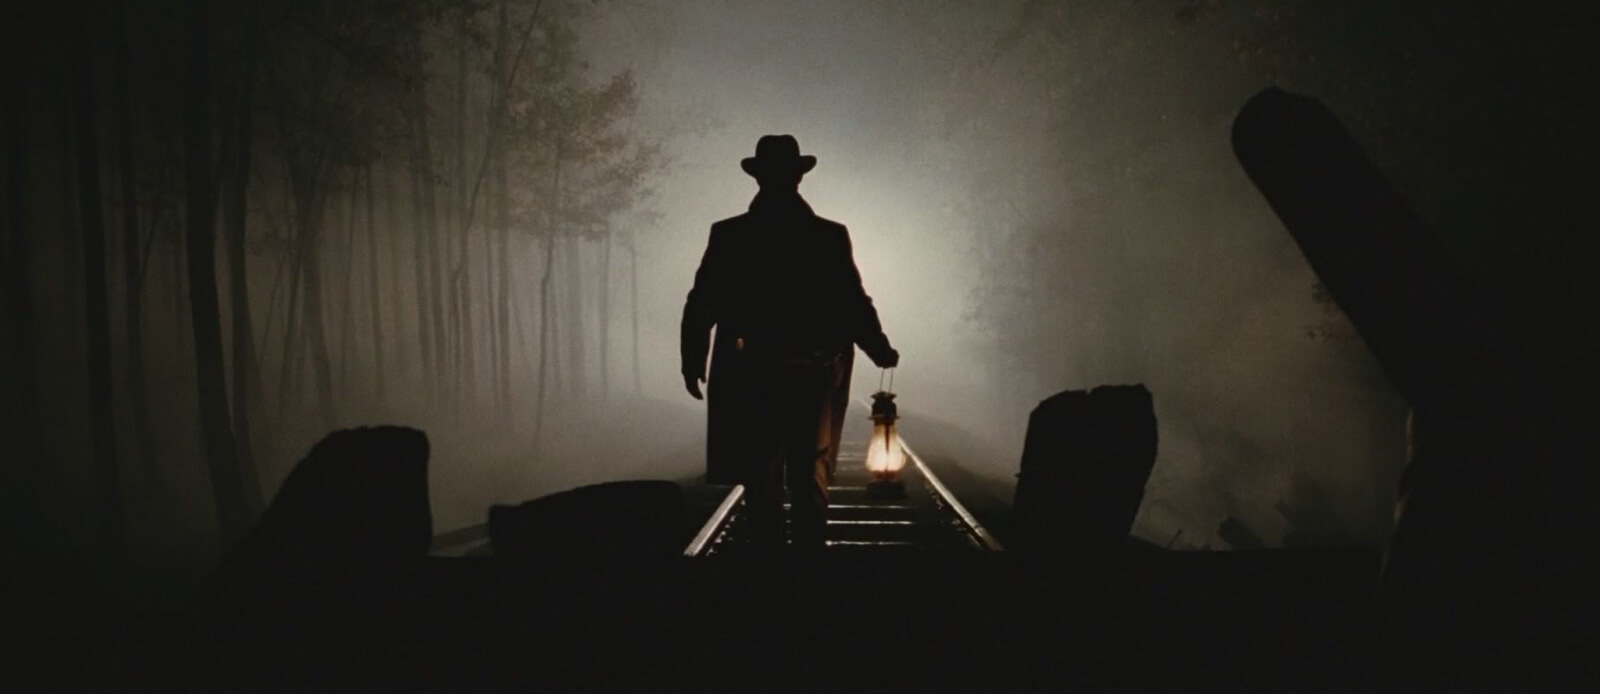
Low-key lighting –

Creates the opposite effect to high-key lighting – heightened shadow and darkness in the scene. Make use of darker backgrounds to avoid light reflections and keep a tight control on the light source. This lighting can create drama and mystery in a film.

High-key and low-key lighting | Low key lighting, Cinematic lighting,  Cinematography

Soft lighting –

Has very few shadows, soft edges and a warm tone, created by using light modifiers and diffusion materials. Can convey happiness, innocence or beauty, as it is considered the most flattering type of lighting.

soft light

Hard lighting –

Harsh lighting with high contrast and shadows, created by a direct beam of light or bright sunlight. It can show tension in the scene between characters or in the narrative.

high key lighting

Motivated lighting –

Uses a light source within the scene and intensifies its effects. It mimics the existing light in the scene, but is created through increasing the strength of the light source or using flags and bounce cards to appear more natural.

Film Lighting Techniques - 3-Point Lighting - Jesse James

Practical lighting –

Makes use of light already in the scene due to props. It helps to keep larger parts of the set visible and can be created through swapping out the bulbs in light sources with stronger ones and altering the colours to maintain the ambience of the scene if necessary.

Skyfall Deakins Practical Light Example

Coursework Research Into Scripting Conventions

There are certain layout conventions that should be adhered to when writing a screenplay, including:

  • 12 point Courier font
  • wide margins (1.5 inch left margin and 1 inch right, top and bottom margins)
  • pages numbered in the top right corner, starting from the second page with a 2. (so excluding the title page and first page number)
  • dialogue should be centred with the speaking character’s name in capital letters
  • sluglines (whether the scene is inside/outside, the specific location and the time of day, e.g INT. CLASSROOM – DAY) and sound should also be in capitals
  • extensions can be used to signal whether the dialogue is being spoken off-screen (O.S.) or in voice-over (V.O.)
  • a description can be used to indicate how the character looks or talks and should be placed in brackets under the dialogue
  • ‘FADE OUT’ to end the script

It is also worth noting what a screenplay shouldn’t do, including:

  • writing camera instructions (the screenplay can describe something in a way that means the director infers a camera movement or shot)
  • writing something that cannot be seen visually (such as an emotion the character is feeling or some extra details about an object that is not clear from the image of it on-screen)

Paragraphing can be structured in large sections or broken down into individual actions and images, whilst the use of ‘CUT TO:’ is also largely the scriptwriter’s choice. Each script page is typically a minute’s worth of screen time.

An example screenplay page taken from Boogie Nights